Nginx
What is a Web Server?
A web server is software and hardware that
uses HTTP (Hypertext
Transfer Protocol) and other protocols to respond to client requests
made over the World Wide Web. The main job of a web server is to display
website content through storing, processing, and delivering webpages to users.
Besides HTTP, web servers also support SMTP (Simple
Mail Transfer Protocol) and FTP (File Transfer Protocol), used for email, file
transfer, and storage.
Web servers are used in web hosting or
the hosting of data for websites and web-based applications -- or web
applications.
How do web servers work?
Web server software is
accessed through the domain names of websites and ensures the delivery of the
site's content to the requesting user. The software side is also comprised of
several components, with at least an HTTP server. The HTTP server is able to
understand HTTP and URLs. As hardware, a web server is a computer that
stores web server software and other files related to a website, such
as HTML documents, images, and JavaScript files.
When a web browser, like
Google Chrome or Firefox, needs a file that's hosted on a web server, the
browser will request the file by HTTP. When the request is received by the web
server, the HTTP server will accept the request, find the content, and send it
back to the browser through HTTP.
More specifically, when a browser
requests a page from a web server, the process will follow a series of
steps.
1.
First, a person will specify a URL in a web browser's address
bar.
2.
The web browser will then obtain the IP address of the domain name
-- either translating the URL through DNS (Domain Name System) or by
searching in its cache. This will bring the browser to a web server.
3.
The browser will then request the specific file from the webserver
by an HTTP request. The web server will respond, sending the browser the
requested page, again, through HTTP.
4.
If the requested page does not exist or if something goes wrong,
the web server will respond with an error message.
5.
The browser will then be able to display the webpage.
Multiple domains also can be
hosted on one web server.
Examples of web server use
Web servers often come
as part of a larger package of the internet- and intranet-related programs that
are used for:
· sending
and receiving emails;
· downloading
requests for File Transfer Protocol (FTP) files;
· building
and publishing webpages.
Common and top web server
software on the market
There are a number of
common web servers available, some including:
· Apache
HTTP Server. Developed by Apache Software Foundation, it is a free and
open-source web server for Windows, Mac OS X, Unix, Linux, Solaris, and other
operating systems; it needs the Apache license.
· Microsoft
Internet Information Services (IIS). Developed by Microsoft for
Microsoft platforms; it is not open-sourced but widely used.
· Nginx. A
popular open-source web server for administrators because of its light resource
utilization and scalability. It can handle many concurrent sessions due to its
event-driven architecture. Nginx also can be used as a proxy server and load balancer.
· Lighttpd. A
free web server that comes with the FreeBSD operating system. It is seen as
fast and secure while consuming less CPU power.
· Sun
Java System Web Server. A free web server from Sun Microsystems that
can run on Windows, Linux and Unix. It is well-equipped to handle medium to
large websites.
What is Nginx?

Nginx Architecture
Nginx uses Master-Slave architecture by supporting event-driven, asynchronous, and non-blocking model.

Why should we use Nginx?

Configuration Settings
The core settings
of NGINX are mainly configured in the Nginx.conf file. The configuration file
is mainly structured into contexts(event context and Http context).
worker_process: Settings that define the number of
worker_process that NGINX use. The number will be the number of CPU cores.
worker_connections: Maximum number of simultaneous
connections for each worker_process.
access_log
& error_log:
These are the files that Nginx uses to log any errors and access attempts.
These loges are used for debugging and troubleshooting.
gzip: These are settings for gzip
compression of Nginx responses.
How to install NGINX?


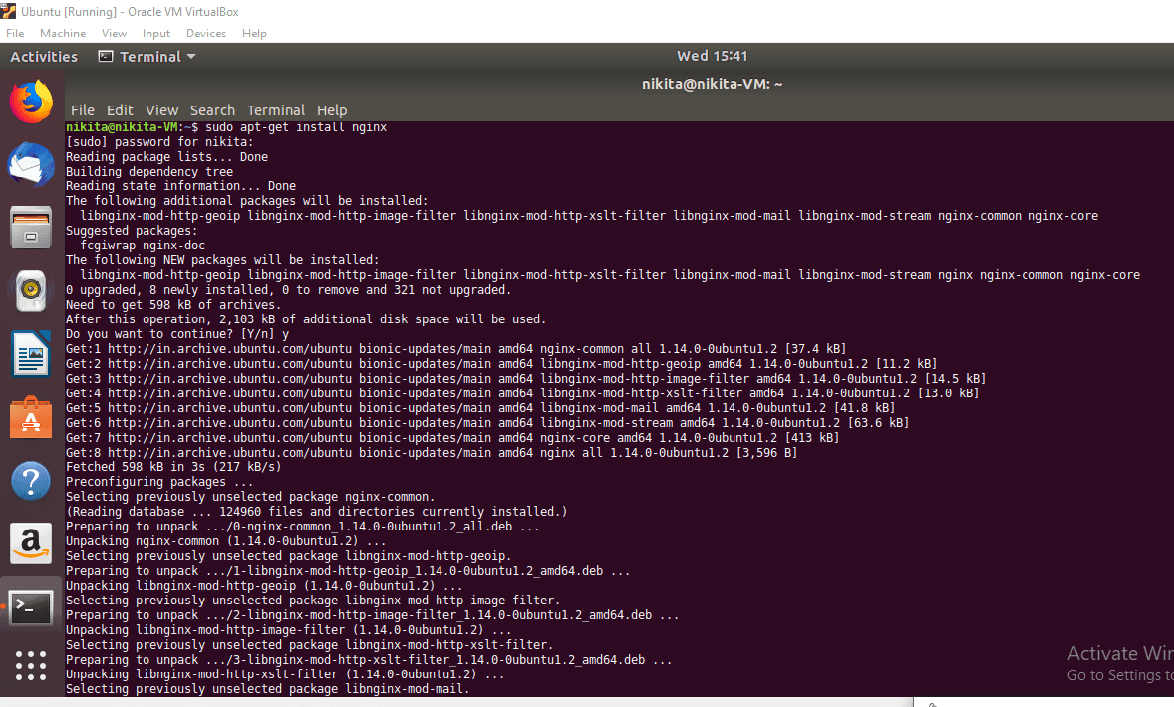
2. Since Nginx is available in the default repository of Debian or Ubuntu, it is possible to install it from these repositories using the apt packaging system.
sudo apt-get install nginx
3. Once it is done, use the following command to see the process for the webserver in a running state.
ps -ef | grep nginx


Here,
Nginx Full: It allows both ports 80 and 443.
Nginx HTTP: It allows only port 80.
Nginx HTTPS: It allows only port 443.
To allow both ports HTTP 80 and HTTPS 443 then use the following command:
sudo ufw allow 'Nginx Full'
To allow only Nginx HTTP port 80 use the following command:
sudo ufw allow 'Nginx HTTP'
To allow only Nginx HTTPS port 443, use the following command:
sudo ufw allow 'Nginx HTTPS'

5. By default, after the installation of Ubuntu, the Nginx starts automatically and we can check the status of the Nginx with the help of the following command:
systemctl status nginx

Manage the NGINX Process
Now that you have your web
server up and running, we can go over some basic management commands.
To stop your web server
sudo systemctl stop nginx
To start the web server when
it is stopped
sudo systemctl start nginx
To stop and then start the
service again
sudo systemctl restart nginx
If you are simply making
configuration changes, NGINX can often reload without dropping connections. To
do this, this command can be used
sudo systemctl reload nginx
By default, NGINX is
configured to start automatically when the server boots. If this is not what
you want, you can disable this behavior by typing:
sudo systemctl disable nginx
To re-enable the service to
start up at boot
sudo systemctl enable nginx
To test your config file
sudo nginx -t
Important NGINX Files and Directories
So once you get to know how to
manage the service itself, you should take a few minutes to familiarize
yourself with a few important directories and files.
Content
·
/var/www/html:
The actual web content, which by default only consists of the default Nginx
page you saw earlier, is served out of the /var/www/html directory. This can be
changed by altering NGINX configuration files.
Server Configuration
·
/etc/nginx: The NGINX configuration
directory. All of the Nginx configuration files reside here.
·
/etc/nginx/nginx.conf: The main NGINX configuration file. This can be
modified to make changes to the NGINX global configuration.
·
/etc/nginx/sites-available/: The directory where per-site “server blocks” can be
stored. NGINX will not use the configuration files found in this directory
unless they are linked to the sites-enabled directory (see below). Typically,
all server block configuration is done in this directory and then enabled by
linking to the other directory.
·
/etc/nginx/sites-enabled/: The directory where enabled per-site “server blocks”
are stored. Typically, these are created by linking to configuration files
found in the sites-available directory.
·
/etc/nginx/snippets: This directory contains configuration fragments that
can be included elsewhere in the NGINX configuration. Potentially repeatable
configuration segments are good candidates for refactoring into snippets.
Server Logs
·
/var/log/nginx/access.log: Every request to your web server is recorded in this
log file unless and until NGINX is configured to do otherwise.
·
/var/log/nginx/error.log: Every NGINX error will be recorded in this log only.
Configure NGINX to
serve your website
You’ll
need to tell NGINX about your website and how to serve it.
cd into
/etc/nginx/. This is where the NGINX configuration files are located.
The two
directories we are interested in are sites-available and sites-enabled.
·
sites-available
contains individual configuration files for all of your possible static
websites.
·
sites-enabled
contains links to the configuration files that NGINX will actually read and
run.
Now, cd
into /etc/nginx/sites-enabled and edit default file using nano or vi as per
your choice to following :
server {
    listen 80 default_server;
    listen [::]:80 default_server;
    root /var/www/html;
    index index.html;
    server_name _;

    location / {
       try_files $uri $uri/ =404;
     }
}
The
above code is for:
·
Deliver
files from the folder /var/www/html or this can be a path to your index.html.
·
The main index page is called index.html.
·
Requests
that are requesting should be served by this server block.
Now, if
you are about to restart NGINX you should see your site!
sudo systemctl restart nginxConfigure
NGINX to serve your backend
You’ll
need to tell NGINX about your website and how to serve it.
cd into
/etc/nginx/. This is where the NGINX configuration files are located.
The two
directories we are interested in are sites-available and sites-enabled.
·
sites-available
contains individual configuration files for all of your possible static
websites.
·
sites-enabled
contains links to the configuration files that NGINX will actually read and
run.
Now, cd
into /etc/nginx/sites-enabled and edit default file using nano or vi as per
your choice to following :
server {
    listen 80 default_server
    listen [::]:80 default_server;
    root /var/www/html;
    index index.html;
    server_name _;

    location / {
       try_files $uri $uri/ =404;
    }

    location /api/ {
           proxy_pass http://localhost:8080/;
           proxy_http_version 1.1;
           proxy_set_header Upgrade $http_upgrade;
           proxy_set_header Connection 'upgrade';
           proxy_set_header Host $host;
           proxy_cache_bypass $http_upgrade;
    }

}
What
does the above code means
·
On /api
route back-end can be accessed which is a link to out local-host process in the port
8080
If you
have gone through the entire blog, you might have understood everything on how
to install Nginx and configure it for your usage. The blog has also given you
information about creating a reverse proxy and creating redirects.
Configure NGINX to serve your Image
folder
cd into
/etc/nginx/sites-enabled and edit default file using nano or vi as per your the choice to following:
server {
    listen 80 default_server;
    listen [::]:80 default_server;
    root /var/www/html;
    index index.html;
    server_name _;

    location / {
       try_files $uri $uri/ =404;
    }
    location /api/ {
           proxy_pass http://localhost:8080/;
           proxy_http_version 1.1;
           proxy_set_header Upgrade $http_upgrade;
           proxy_set_header Connection 'upgrade';
           proxy_set_header Host $host;
           proxy_cache_bypass $http_upgrade;
    }  location /images {
           alias uploads/images/;
    }
}
What
does the above code means
·
On
/images route images can be accessed which is a link to instance folder uploads/images. It will point to all images in the images folder.
Conclusion
If you have gone through the entire blog, you might have understood everything on how to install Nginx and configure it for your usage.


Comments
Post a Comment